構造函式
簡介
- 如果今天要建立一個 user 物件如下
- 以這種寫法創建的物件,稱作實字物件 (Object literal)
const user = {
    name: 'Andy',
    gender: 'male'
    age: 30,
    hello: function() {
        console.log('say hello')
    }
}
- 但如果要建立很多的 user 物件,這樣的方法顯然是很沒有效率的
- 我們需要創建一個模板類型,來大量建立類似的物件
如何創建
- 命名通常以大寫字母開頭
- 只能由 new 關鍵字來執行
- 使用 new 關鍵字執行函式的行為被稱為實例化
- 實例化構造函式時沒有參數可以省略
() - 內部不用寫 return,回傳值就是新建立的物件
- 在實例方法中,
this就表示當前的實例
範例
- 每個 user 都有
name,gender,age - 這些是這個類別的屬性(properties)
function User(name, gender, age) {
  // properties
  this.name = name
  this.gender = gender
  this.age = age
}

const jerry = new User('Jerry', 'female', 18)
const tom = new User('Tom', 'male', 22)
- 構造函式建立的物件彼此獨立,佔據的記憶體位置不同
- 若要在類別中定義公用的方法,不推薦在 function 內定義
- 例如每個 user 都要有一個
hello方法
範例 1:使用 this 在 constructor function 內創建
function User(name, gender, age) {
  // properties
  this.name = name
  this.gender = gender
  this.age = age

  // method
  this.hello = function () {
    console.log('say hello')
  }
}

const jerry = new User('Jerry', 'female', 18)
const tom = new User('Tom', 'male', 22)

// 以下都是一樣的方法,得到相同的結果
// 卻佔了兩個記憶體位置 😓
jerry.hello()
tom.hello()
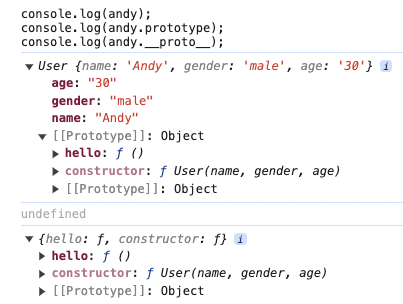
範例 2:使用 prototype
- 將共用的方法,放到
prototype中 - 在呼叫物件的方法時,JavaScript 會透過原型鏈尋找該方法是否存在
- 所以將方法放入 constructor 的原型裡,每個物件實例都可以使用
function User(name, gender, age) {
  // properties
  this.name = name
  this.gender = gender
  this.age = age
}

// method
User.prototype.hello = function () {
  console.log('say hello')
}

// 從原型鏈找到 👍🏼
const andy = new User('Andy', 'male', '30')
andy.hello() // say hello
- 雖然
andy這個物件中,沒有hello,但從原型鏈(prototype)中,可以找到該方法並呼叫

Class
- 在 ES6 加入的新語法
- 用來簡化 constructor function 的語法糖
class Car {
  constructor(brand, color) {
    this.brand = brand
    this.color = color
  }
  accelerate() {
    console.log('可以加速')
  }
}

const myCar = new Car('Ferrari', 'red')
myCar.accelerate() // 可以加速
Getter & Setter
- 當想改變物件內的值時,一般寫法如下
class Car {
  constructor(brand, color) {
    this.brand = brand
    this.color = color
  }
}

const myCar = new Car('Mazeda', 'White')
console.log(myCar) // { brand: 'Mazeda', color: 'White'}
myCar.color = 'Yellow'
console.log(myCar) // { brand: 'Mazeda', color: 'Yellow' }
問題
- 但如果想限制
brand和color不能是空字串,以上方法沒辦法幫我們驗證
改善方法
- 在關鍵字
get,set後面加上屬性名稱,定義對應的getter和setter - 在
setter中,可以加上自定義的邏輯,例如驗證或格式化,當屬性的值改變時觸發 - 對於只有區域內可以存取到的變數,通常以
_開頭來命名
class Car {
  constructor(brand, color) {
    this._brand = brand
    this._color = color
  }

  // Getter for 'brand'
  get brand() {
    return this._brand
  }

  // Setter for 'brand'
  set brand(value) {
    if (value.length > 0) {
      this._brand = value
    }
  }

  // Getter for 'color'
  get color() {
    return this._color
  }

  // Setter for 'color'
  set color(value) {
    if (value.length > 0) {
      this._color = value
    }
  }
}

// 使用示例
const myCar = new Car('Toyota', 'Red')
console.log(myCar.brand) // Toyota
console.log(myCar.color) // Red

myCar.brand = 'Honda'
myCar.color = 'Blue'
console.log(myCar.brand) // Honda
console.log(myCar.color) // Blue
extends
- 是一個用於類(class)繼承的關鍵字
- 用於創建一個子類,繼承了父類的所有屬性和方法
- 如果子類沒有定義自己的構造函數,則會調用父類的構造函數
- 在子類的構造函數中,必須使用
super()來調用父類的構造函數 - 子類可以重寫繼承自父類的方法
// 父類
class Vehicle {
  constructor(brand) {
    this.brand = brand
  }

  start() {
    console.log(`${this.brand} vehicle is starting.`)
  }
}

// 子類
class Car extends Vehicle {
  constructor(brand, model) {
    super(brand) // 調用父類的構造函數
    this.model = model
  }

  start() {
    super.start() // 調用父類的方法
    console.log(`${this.brand} ${this.model} is ready to go!`)
  }
}

const myCar = new Car('Toyota', 'Corolla')
myCar.start()
// 輸出: Toyota vehicle is starting.
//       Toyota Corolla is ready to go!
static
- 在 class 上定義靜態屬性和方法
- 靜態方法和屬性,屬於 class 本身
- 不需要創建實例來調用靜態方法和屬性
class MathUtility {
  // 靜態方法
  static sum(a, b) {
    return a + b
  }

  // 靜態屬性
  static pi = 3.14159
}

// 調用靜態方法
console.log(MathUtility.sum(10, 5)) // 輸出: 15

// 訪問靜態屬性
console.log(MathUtility.pi) // 輸出: 3.14159
Public Class Fields
- 在所有實例上都可以取得的屬性或方法
- 可以直接被修改
class Car {
  color = 'Pink'

  constructor(brand) {
    this.brand = brand
  }
}

const myCar = new Car('Nissan')
// 可以直接改myCar的color和brand
myCar.color = 'Green'
myCar.brand = 'Ford'
console.log(myCar) // { color: 'Green', brand: 'Ford' }
Private Class Fields
- 只能在 class 內被訪問的變數或方法
- 以
#開頭,表示是私有的
class BankAccount {
  #balance // 帳戶餘額

  constructor(initialBalance) {
    this.#balance = initialBalance // 初始化餘額
  }

  deposit(amount) {
    if (amount > 0) {
      this.#balance += amount
      console.log(`存入 ${amount}。當前餘額:${this.#balance}`)
    }
  }

  withdraw(amount) {
    if (amount <= this.#balance) {
      this.#balance -= amount
      console.log(`提取 ${amount}。當前餘額:${this.#balance}`)
    } else {
      console.log('餘額不足,無法提取!')
    }
  }

  getBalance() {
    return this.#balance // 提供公開方法來獲取餘額
  }
}

// 使用範例
const myAccount = new BankAccount(1000)
myAccount.deposit(500) // 存入 500
myAccount.withdraw(200) // 提取 200
console.log(`帳戶餘額:${myAccount.getBalance()}`) // 查詢餘額

// 直接訪問 #balance 會有錯誤
console.log(myAccount.#balance) // SyntaxError
參考資料
# JavaScript # Constructor # Class